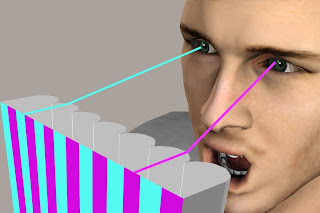
A Very Simplified Illustration - The cyan stripes represent View 1 and the magenta stripes View 2. Most lenticular prints are made from anywhere between 10 - 30 views. (It was too much work to make even 10 stripes per lenticule)
Traditional stereo viewers work by displaying two different perspectives of a scene, usually taken by a stereo camera with two lenses an inch or so apart, just like your eyes. When viewed with a stereo viewer each eye sees the scene from a slightly different perspective and just as we view scenes in real life, the scene is perceived as having 3 dimensionality.
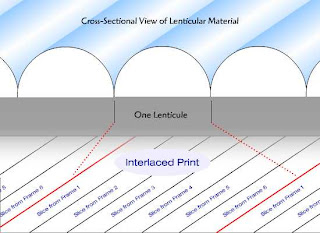
Lenticular prints work by taking a series of captured or rendered views (usually between 8 and 24) and interlacing them to form one very high resolution image. The interlacing software takes the multiple camera views (or frames) and slices them up into many vertical strips and then basically collates these strips putting one strip from each view under each lenticule (see image above). When you view the final print the lenses will present each eye with a different view creating a 3D image.
3D is just one of the effects possible with lenticular. If you rotate the lenticular sheet so that the lenticules run horizontally you can use it to make animated hand held cards. Some of the animation effects possible are a 2 or 3 image flip, zooms, morphs and very short animations with limited motion.
Some combinations of effects are also possible, for example 3D with a flip or animations of color and sometimes small motions. Personally, I've found that motion is often too distracting on a 3D image.
Monday, December 8, 2008
What is 3D lenticular imaging?
Three-D Lenticular Imaging is a 2D printing process for creating auto-stereographic 3D prints and transparencies. An auto-stereographic 3D print does not require 3D glasses, stereo viewers or any other aids to view an image in 3D.
Lenticular technology in effect, puts the glasses on the print instead. The image is often printed on paper and then laminated with a sheet of lenticular material which is extruded, embossed or engraved with a series of vertically aligned, plano-convex, cylindrical lenses called lenticules.
The image can also be printed directly onto the plastic lens material. This is the method used by most commercial printers because it eliminates the laminating (and manually aligning) step which is very labor intensive. Lenticular prints can be created in small quantities on an inkjet printer, photographically, or in large volumes using presses that print direct to the lens material.
These lens sheets are available in a number of different lens pitches. Lens pitch is the number of lenticules per inch a sheet has. Typically, they range from 15 lpi up to 200 lpi or more. Generally, the lower the pitch the further away the optimum viewing distance. Large low pitch sheets (thicker, less flexible material) are used for very large displays and the higher pitched (thinner, more flexible material) sheets are for items like postcards and business cards. I read in an industry trade mag that some billboard-sized lenticulars have used lenses with lenticules that are 1 or 2 inches wide each.
Surprisingly, lenticular technology has been around since the early 1900’s. It was originally used in several color processes including Technicolor and Kodachrome film. Thanks to computer and digital imaging technologies developed in the 1990’s it has made a big comeback. These new technologies have made it possible to create stunning, high resolution, high quality 3D images.
The technique I developed ten years ago was a simple method of turning 3D scenes I had created in Strata 3D into a series of images for interlacing. The process is the same regardless of which 3D application you use as long as you can animate the camera.
Out of necessity I had to learn how to make my own lenticulars. It can be done, but you need to find some interlacing software (a specialized program like this can be quite expensive, the one I use is $2500, it also does 2D to 3D conversion, but there are other interlacer only versions that start at around $100), a high resolution printer (I use an Epson R220 and 3800), a cold laminator and 3D lenticular lens material and an optically clear adhesive (you can buy sheets with this adhesive already applied).
The process is time consuming (so you’d never want to do large quantities this way). I only use it for prototyping, one-offs and some portfolio samples. It requires quite a bit of skill to align the lens with the print and then get it through the laminator while still keeping it aligned (my success rate is only about 1 in 3). It’s really so much easier to let a professional printer deal with the technical details of lenticular printing.
Next time: How Does it Work?
Labels:
3d,
art,
lenticular,
photography,
printing,
stereo,
virtual
What is Virtual Photography?
by Peter J. Sucy
Most likely I’m not the first to have coined this term, but I’ll attempt to explain what I believe it is and why I’ve chosen it as my primary medium. For you photographers out there, virtual photography offers a photographic tool set unlike any you would ever find in the real world.
Imagine you had a studio where the laws of physics don’t apply. In this studio your camera does not need a tripod and is not affected by gravity. If you put your camera in a spot it will stay there, no one can accidently bump into it except maybe you.
Now imagine that the camera has a zoom lens with a range of 5mm to 1600mm. The f-stop is and shutter speeds are adjustable but every image can be properly exposed no matter what the settings. There is a switch to turn off depth of field so everything is in focus at any f-stop. This camera can even be programmed to follow a path over time, moving through space by itself and recording frames (at a rate selected by you) as it goes. Just about every setting can be manipulated over time as well so you can zoom and pull focus while moving for example.
Your lighting system is even more magical, your lights can be placed anywhere you need them and they won’t show up in your scene, except by their illumination, no potentially dangerous and unsightly light stands and cords. You can change a light from a variable angle spotlight, to an immense soft box, to a point source (great for getting light into those hard to reach places) or even an infinite source like the sun. Every light’s brightness and color can easily be set with a few dials, Each light can have it’s shadows turned on or off, made soft or sharp and even apply gels and effects like mist and fog. The spotlights can even be configured to automatically point at and follow any object in the scene as it moves.
Now here is where it really begins to get exciting. Imagine you could buy a highly detailed set like a city block consisting of several buildings, a street and an alleyway, or a futuristic sci-fi set of a spaceship interior for under $30 and have them delivered to you in minutes without ever leaving your chair.
The same goes for actors/models, backdrops, scenery, costumes, props, and even lights. There are numerous online establishments that provide everything you could imagine for your magical studio. Numerous male and female characters, clothing and period costume, sets, props and more to create your own virtual visions.
These actors are extremely cooperative, posing just the way you want them and holding perfectly still for as long as you want. You can buy libraries of pre-set poses and change the actors pose with a click of a button. Move your timeline out a few seconds and select a different pose and you have just created an animation of the character moving from one pose the other over the time you set on the timeline.
Once you’ve orchestrated your set, the lighting, the actors and framed your scene with your camera you are ready to take the picture. You can choose to produce a single frame or create an entire movie.
Is this some future speculation? No, you can have your own virtual studio today. All you need is a 3D modeling/rendering software program for your PC like 3DMax, Poser, Strata3D, Bryce, Vue or numerous others that are available. Many offer free trials and there are even free 3D programs available. Daz3D (one of the larger content providers) offers their Daz Studio software free for the download (they want you to buy their content of course).
Content Paradise another online 3D content provider is currently offering the previous version of Poser (a popular 3D studio program designed primarily for human figure models) for $29.00 or the current version for only $99, both great bargains. The programs I mentioned also come with quite of content built in so there are figures and props to work with right out of the “box”.
Renderosity is probably the largest content provider with hundreds of artists providing thousands of models and textures for you to buy and download. All of these sites serve as communities for thousands of artists and many offer online tutorials and forums where you can ask questions and get answers from some very talented artists. There are also user galleries where you can post your work for all to see and comment on.
My 3D work became much more productive when I discovered these communities and content providers. Many of my early 3D scenes took months and a few even years because I had to build and texture all my own models. Now a days I can usually complete an entire 3d scene in less than a week because I can buy most of the models I need and re-texture them if needed. The entire set and prop budget for many scenes is usually well under $100.
I’ve found that my field photography has also much improved with the experience gained in the virtual studio. So if you’re looking for something to do when your stuck at home consider getting yourself a virtual studio. If you already have the computer it’s pretty cheap to get into as long as you avoid becoming addicted to buying new content.
Subscribe to:
Posts (Atom)