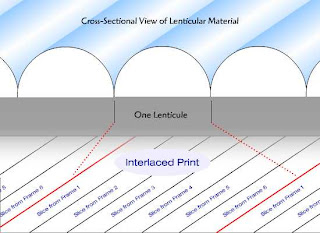
 Three-D Lenticular Imaging is a 2D printing process for creating auto-stereographic 3D prints and transparencies. An auto-stereographic 3D print does not require 3D glasses, stereo viewers or any other aids to view an image in 3D.
Lenticular technology in effect, puts the glasses on the print instead. The image is often printed on paper and then laminated with a sheet of lenticular material which is extruded, embossed or engraved with a series of vertically aligned, plano-convex, cylindrical lenses called lenticules.
The image can also be printed directly onto the plastic lens material. This is the method used by most commercial printers because it eliminates the laminating (and manually aligning) step which is very labor intensive. Lenticular prints can be created in small quantities on an inkjet printer, photographically, or in large volumes using presses that print direct to the lens material.
These lens sheets are available in a number of different lens pitches. Lens pitch is the number of lenticules per inch a sheet has. Typically, they range from 15 lpi up to 200 lpi or more. Generally, the lower the pitch the further away the optimum viewing distance. Large low pitch sheets (thicker, less flexible material) are used for very large displays and the higher pitched (thinner, more flexible material) sheets are for items like postcards and business cards. I read in an industry trade mag that some billboard-sized lenticulars have used lenses with lenticules that are 1 or 2 inches wide each.
Surprisingly, lenticular technology has been around since the early 1900’s. It was originally used in several color processes including Technicolor and Kodachrome film. Thanks to computer and digital imaging technologies developed in the 1990’s it has made a big comeback. These new technologies have made it possible to create stunning, high resolution, high quality 3D images.
The technique I developed ten years ago was a simple method of turning 3D scenes I had created in Strata 3D into a series of images for interlacing. The process is the same regardless of which 3D application you use as long as you can animate the camera.
Out of necessity I had to learn how to make my own lenticulars. It can be done, but you need to find some interlacing software (a specialized program like this can be quite expensive, the one I use is $2500, it also does 2D to 3D conversion, but there are other interlacer only versions that start at around $100), a high resolution printer (I use an Epson R220 and 3800), a cold laminator and 3D lenticular lens material and an optically clear adhesive (you can buy sheets with this adhesive already applied).
The process is time consuming (so you’d never want to do large quantities this way). I only use it for prototyping, one-offs and some portfolio samples. It requires quite a bit of skill to align the lens with the print and then get it through the laminator while still keeping it aligned (my success rate is only about 1 in 3). It’s really so much easier to let a professional printer deal with the technical details of lenticular printing.
Next time: How Does it Work?


No comments:
Post a Comment